Home Assistant - SMS Integration with VoIP.ms
Posted on February 23, 2022 • 7 min read • 1,427 words
I will address why I needed this and how I ended up here in another post. But in a nutshell, here is one not-free-but-cheap way to trigger Home Assistant (HA) automations with text messages and to send status or other informational text messages from HA. At the end, I’ll get fancy and show you how to have HA reply to the text messages it receives.
Requirements
- Home Assistant , publicly accessible and running behind an NGINX reverse proxy (other options might work, but you’ll have to figure that out)
- VoIP.ms Account and DID (phone) number
Home Assistant Setup to Receive Inbound Texts as Event Triggers
Creating Your Automation and Webhook
In HA, you’re going to want to create a webhook to listen for inbound messages from VoIP.ms. You can read more about webhooks here , but the easiest way is to create a new automation.
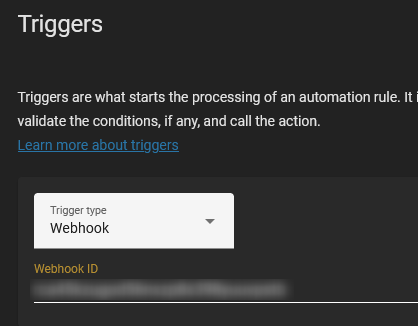
In the “Triggers” section, set the “Trigger Type” to “Webhook”. Then enter a long, random string of characters. (I like to use a password generator to generate a long string, 28 characters or more, of lower case letters and numbers.) This will be your “Webhook ID”.
In the “Actions” section of your automation, create a simple test action, like turning on a light in the room you’re working in.
Save your new automation. To save time troubleshooting later, now would be a good time to manually click that “RUN ACTIONS” link to verify the light comes on as expected.
Building your VoIP.ms Callback URL
Later, when we set up VoIP.ms, one value we’re going to need is an “SMS URL Callback”. This is the URL VoIP.ms will use to send the data it receives in a text message to your HA server. Let’s build that now so we have it ready.
That URL will take the form of:
https://[mysite.com]/api/webhook/[Webhook ID]?from={FROM}&message={MESSAGE}&id={ID}&date={TIMESTAMP}- For [mysite.com], use the public URL of your HA server, without the brackets.
- For [Webhook ID], use the “Webhook ID” string created in your HA automation above, without the brackets.
Build this string in a text editor and hang on to it to copy/paste later.
Fixing the POST/GET Issue via NGINX Reverse Proxy
Currently, HA only supports webhooks received via POST requests. GET requests are not supported. But VoIP.ms can only send GET requests. That’s a problem… unless you force it via your NGINX site config.
In your NGINX configuration for your HA server, create a new location section that looks something like this:
location /api/webhook {
  [your normal proxy_header and other config details]

  # Added to force POST requests for Webhooks
  proxy_method POST;
  proxy_hide_header Content-Type;
  add_header Content-Type text/plain;
}
Restart NGINX.
Testing HA and the Callback URL
Now you can test that the webhook works by filling in bogus data in the Callback URL and pasting it into your browser. It should trigger your automation and turn on your light.
Something like this:
https://mysite.com/api/webhook/123398ugo8dfa0984?from=1234567890&message=testVoIP.ms Account and Phone Number Setup
Keep in mind that VoIP.ms is a full-service provider. There are a lot of options that we won’t bother with.
First, go to VoIP.ms and “Sign Up” and get a DID number. “DID” stands for “direct inward dial” and is the phone number you’re going to use to send and receive text messages. You can read more about the steps in the VoIP.ms Getting Started Guide .
Once you have your number, go to “DID Numbers -> Manage DID Numbers” from the top navigation menu. You’ll see a screen that looks something like this.
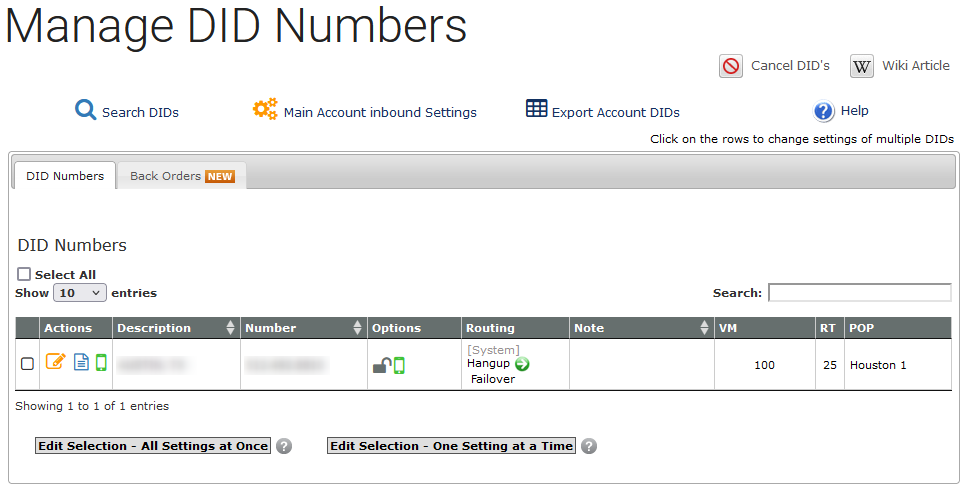
Click the orange “Edit DID” icon to make changes to the settings for this number.
Routing Settings
This Routing Settings section is telling the system what to do when your phone number receives an inbound call. To ignore all inbound calls, select the last option, “System” and choose “Hangup” from the drop-down list.
DID Point of Presence
Again, this is mostly for voice calls. Choose the POP Server closest to you, or use the automatically chosen POP VoIP.ms recommends.
Unless you’re doing something with voice, you can skip the rest.
Message Services (SMS/MMS)
THIS is what we’re looking for.
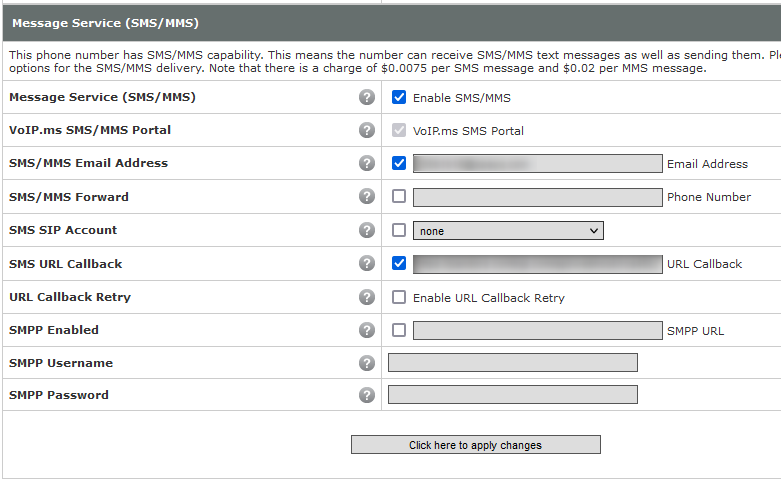
- Click the checkbox to “Enable SMS/MMS”.
- If you want the system to email you all text messages received check the box to enable “SMS/MMS Email Address” and enter a destination email address.
- Click the checkbox to enable “SMS URL Callback”. The copy and past the Callback URL you created earlier.
Save your settings.
Testing Receipt of SMS Messages to Trigger Your Automation
At this point, everything is set up. You should now be able to send a text message to your new DID number. When VoIP.ms receives that message (which you can verify via the “DID Numbers -> SMS/MMS Message Center” menu option), it should send the message details to the Callback URL (your HA server). When your HA server receives it, it should trigger your automation and turn on your light.
Home Assistant and VoIP.ms Setup to Send Outboud SMS Text Messages From HA
VoIP.ms API Setup
To send SMS text messages from HA, we first need to set up VoIP.ms API to receive them.
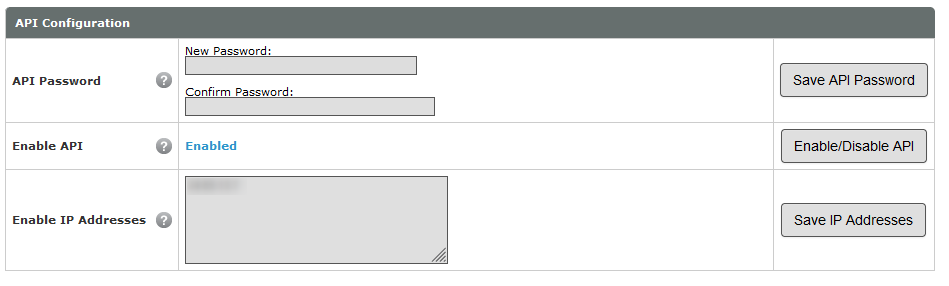
To enable VoIP.ms API, select “Main Menu -> SOAP and REST/JSON API”.
- Enter a new API password and click the ‘Save API Password’ button.
- Click the “Enable/Disable API” button. After doing so, it should say “Enabled” (see below).
- Enter the public IP address(es) of your Home Assistant instance. (Only API requests coming from this IP address will be allowed.) Then click the “Save IP Addresses” button.
Create a REST Command in HA
To send text messages from HA, you’ll need to create a REST command that will appear as a Service you can call in your Actions section of an automation. Add a section similar to the following to your configuration.yaml.
# rest_commands
rest_command:
  sms_reply:
    url: "https://voip.ms/api/v1/rest.php?api_username=[username]&api_password=[APIpassword]&method=sendSMS&did=[yourDID]&dst={% raw %}{{ dst }}{% endraw %}&message={% raw %}{{ message }}{% endraw %}"
    method: get
You can name your command whatever you want. I called mine “sms_reply”.
- For [username], use your VoIP.ms account username/email address, without the brackets.
- For [APIpassword], use the API Password you set above, without the brackets.
- For [yourDID], use the new DID number your ordered, without the brackets.
Note that we’re using template values for “dst” (destination) and “message” fields. This will allow us to code the destination number and message you want to send in your automations. {: .notice–info}
Save your configuration.yaml file and restart your HA server to load up the new entry.
Sending a Text Message From an HA Automation
Now we’re going to tell HA to text us when the light was turned on in the original automation.
Open the automation you created earlier and go to the Actions section.
Create a new Action, edit in YAML and add something like this:
- service: rest_command.sms_reply
  data:
    dst: [your phone number]
    message: "The light is now on."
For [your phone number], use your mobile number, without the brackets.
Save your automation.
Now, you can manually “RUN ACTIONS” on the automation. Your light should turn on AND you should shortly receive a text message saying so.
Replying to a Text Message From an HA Automation
For HA to reply to a text message it received that triggered an automation, it just needs to know the phone number. You can retrieve this using the {{ trigger.query.from }} template that will pull the number from the Callback URL sent by VoIP.ms.
So, instead of the above action, you can use this:
- service: rest_command.sms_reply
  data:
    dst: {% raw %}{{ trigger.query.from }}{% endraw %}
    message: "The light is now on."
Now, HA will reply to whatever number the trigger text message was received from.
Side note: The from, message, id and timestamp values can be extracted from the URL the same way (eg, {% raw %}{{ trigger.query.message }}{% endraw %} or {% raw %}{{ trigger.query.date }}{% endraw %}). In my use case, I parse the message text looking for different ‘commands’, and have a series of ‘Choose’ actions to do different things based on the message content.
Summary
The above will give you a basic functioning capability. Obviously, you can get fancier.